al-luckylady

Saturday, January 25, 2020

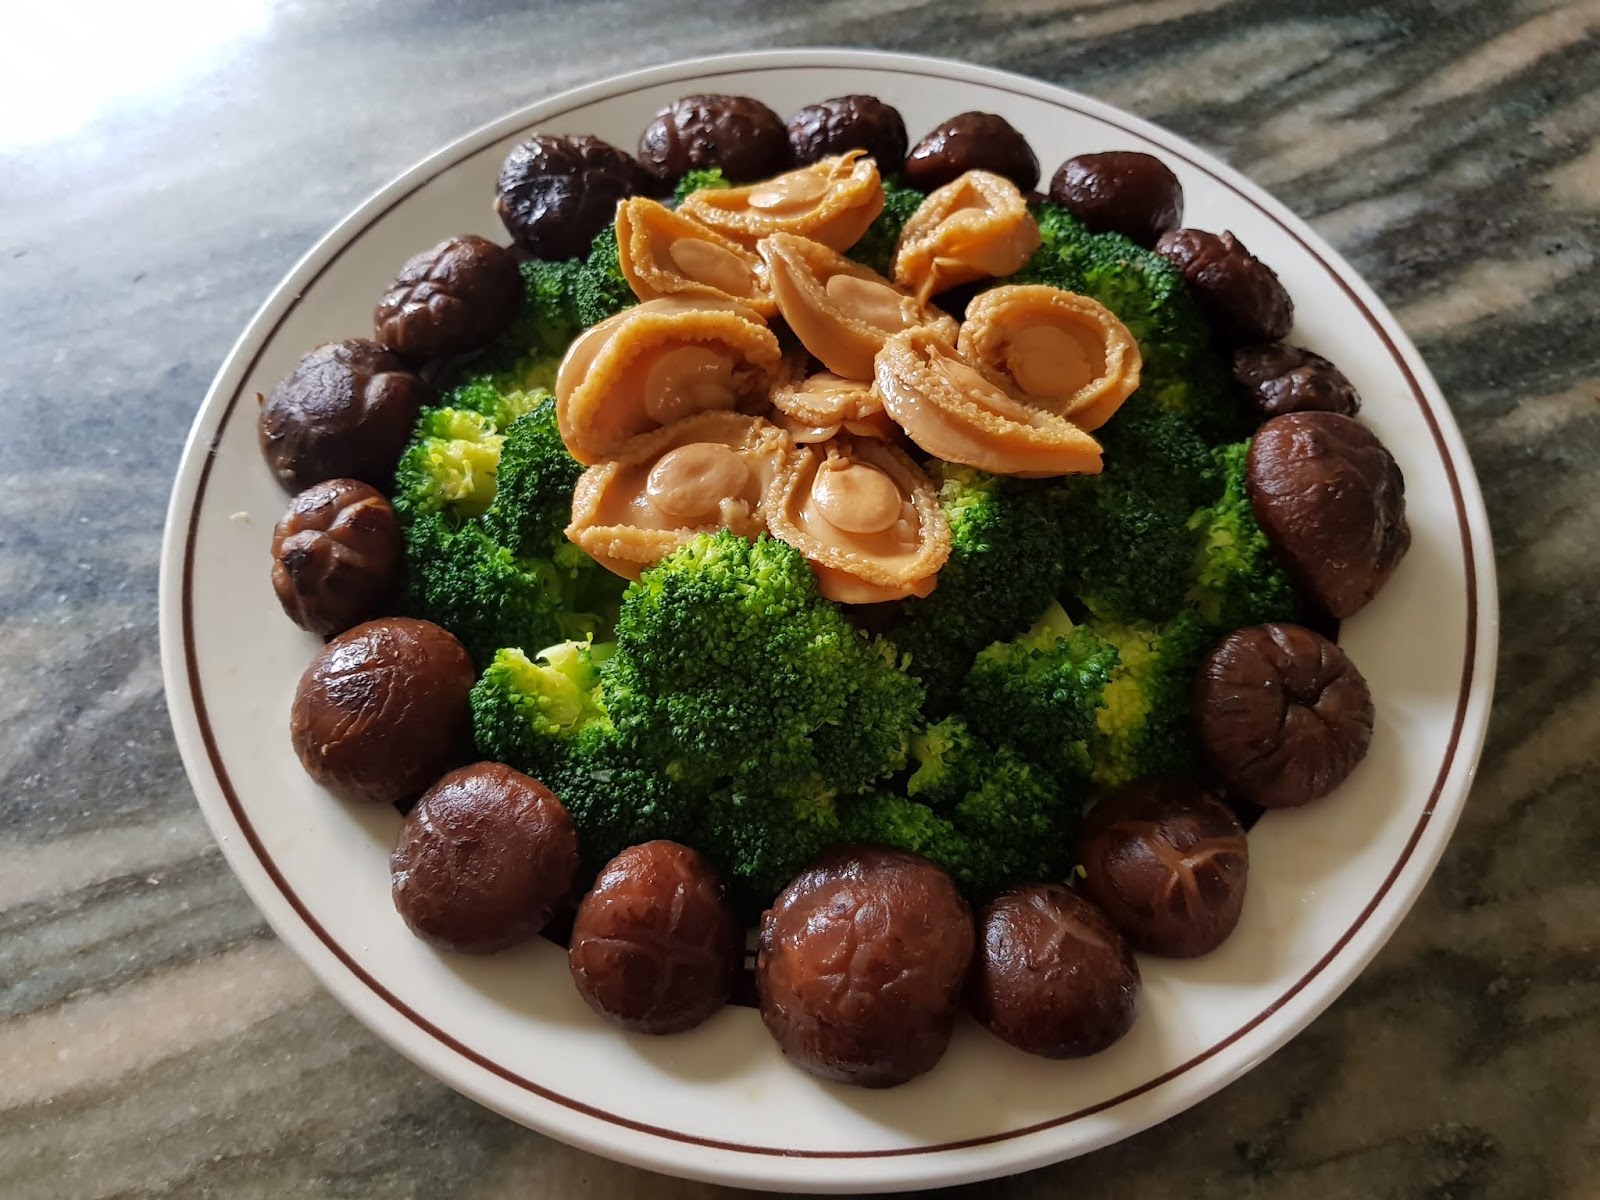
Broccoli with Mushroom and Abalone (Optional Sea Cucumber & Fatt Choy)


A luxurious dish; one doesn't just cook this dish on any ordinary day. It is only on special occasions like birthdays or festive seasons like the Chinese New Year that I cook this dish. It is a very simple dish to cook; the process involves braising the mushrooms, sea cucumber and baby abalones (if they are not already ready to serve) and blanching the broccoli.


Ingredients:
  • 18 pieces medium sized Shiitake mushrooms
  • 1 head of broccoli
  • 1 can of ready-to-serve baby abalone (10 pieces)
  • For festive season, add
    • 1-2 pieces sea cucumber
      • Prepare them 5 days in advance by soaking them till they are about 4 times the size of the dried ones and removing the entrails.
    • Fatt choy, the amount depends on you.
      • Put them into a sieve and run the tap water onto them.
  • 4 cloves garlic, chopped
  • 1 cup chicken broth
  • 2 tbsp light
  • 1 tbsp dark soy sauce
  • 1/2 tsp salt (or to taste)
  • 1 tsp white pepper powder
  • 1 tbsp cooking oil
  • 2 tbsp sesame oil
  • 1 tbsp corn flour plus some water for thickening of sauce.

Method:
  • Soak the Shiitake mushrooms for about 3 hours till they are plumped up. Remove the stems.
  • Wash and cut the broccoli into florets. Soak them for about 30 minutes.
  • Open 1 can of ready-to-serve baby abalones. Separate the abalones from the sauce. Keep the sauce for later use.
  • Cut the sea cucumber diagonally about 1 1/2 cm wide.
  • Heat up the wok with cooking and sesame oil.
  • Saute the garlic till they are fragrant.
  • Add the mushrooms and saute the mushrooms till they are fragrant.
  • Add the chicken broth and abalone sauce into the wok. Let is boil.
  • Add sea cucumber.
  • Add the seasonings - light and dark soy sauce, salt and white pepper powder.
  • Cover the wok and let the mushrooms and sea cucumber braise in the sauce over very low fire till they are both soft.
  • While the mushrooms and sea cucumber are being braised, prepare the broccoli.
    • Boil a pot of water and prepare a pot of cold water.
    • Add the broccoli florets into the pot of boiling water. Blanch them for about 5-8 minutes.
    • Remove the florets and dunk them into the pot of cold water to stop them from cooking further.
  • When the mushrooms and sea cucumber have softened, remove them from the sauce.
  • Add in the baby abalones to heat up. Remove them immediately once they are hot.
  • Add in the fatt choy.
  • Let the sauce boil.
  • Add the corn flour water to thicken the sauce.
  • Arrange the broccoli florets, mushrooms and baby abalones on a serving plate.
  • Pour the sauce over them.
  • The dish is ready for serving.

Monday, January 13, 2020

No-Knead Bread


The No-knead Bread method of bread baking is one that uses a very long fermentation time, usually ranging from 18-24 hours. As the name suggests there is no kneading involved. The gluten strands that gives the bread its texture is formed from the long, slow rise of the dough at room temperature. Only 4 ingredients - all-purpose or bread flour, salt, yeast and water - are used to make this bread. The ingredients are mixed and let sit for at least 18 hours (although some bakers have let their dough sit for less) and proofed for 2 hours (again, some bakers proof for only 30 minutes) before it is baked in a covered dutch oven for 30 minutes and uncovered for 15 minutes to get the rusty colour. The dough is wet and looks shaggy when mixed. However, we should not add too much flour when handling the dough or else the bread will be dense.


Ingredients:
  • 3 cups bread flour
  • 1/2 tsp yeast
  • 1 tsp salt
  • 1 1/2 cup warm water

Method:
  • Add all the dry ingredients into a mixing bowl.
  • Stir them up so that they are mixed evenly.
  • Add the warm water to the bowl.
  • Mix the dry ingredients and warm water up till they form a shaggy dough.
  • Cover the bowl with a cling wrap and let the dough sit at room temperature for 18 hrs.
  • Flour the counter-top.
  • Tip the dough onto it. Add some flour on top of the dough.
  • Shape & put it on parchment paper.
  • Put the parchment paper with dough into a bowl to hold the shape of the dough.
  • Proof for 2 hrs.
  • Heat up a dutch oven for 30 min at 230 deg C.
  • Transfer parchment paper with dough into the pre-heated dutch oven.
  • Bake the dough for 30 minutes with the lid on and a further 10-15 minutes with lid off.
  • Let the bread cool down before slicing.

Sunday, January 12, 2020

Mini Japanese Pancakes


Japanese Pancakes are good for breakfast or morning and afternoon tea breaks. The difference between these pancakes and the normal ones are in the meringue. For normal pancakes, we just mix all the ingredients and fry. They are round and big but thin. For Japanese Pancakes, the beating of the meringue is important; the egg whites are whipped with sugar which give the pancake its fluffy nature. Vinegar is used to stabilise the meringue to hold its form. Usually Japanese Pancakes are fried using a ring mould. The size of these pancakes are dependent on the size of the ring. The pancakes are soft, fluffy and tall. For my mini pancakes, I have not used the ring mould; instead, I just piped the batter directly onto the non-stick pan.


Ingredients:
  • 2 egg yolks (I use Grade B eggs - about 68 g egg with shell.)
  • 20 ml or g full cream milk
  • 10 ml or g vegetable oil (I use corn oil.)
  • 1/4 tsp vanilla essence (Optional.)
  • 40 g all-purpose flour
  • 3 egg whites (From eggs of about 68 g with shell.)
  • 1 tsp vinegar (I use rice vinegar.)
  • 50 g castor sugar (You may reduce or add more.)

Method:
  • Add the egg yolks into a mixing bowl.
  • Add full cream milk into the bowl.
  • Add vegetable oil into the bowl.
  • Use a whisk to mix the three ingredients till they are well combined.
  • Add the vanilla essence. Continue to mix till the vanilla essence is incorporated.
  • Sift the flour into the egg yolk mixture.
  • Mix till the batter is smooth without any lumps. Set aside.
  • Add the egg whites into a dry clean bowl.
  • Add vinegar into the bowl.
  • Use a hand held mixer to whip the egg whites.
  • Once big bubbles are formed, start adding the sugar in three batches, mixing well after each addition.
  • Beat the egg whites until stiff peaks.
  • Fold the egg whites gently into the egg yolk mixture in 3 batches, taking care not to deflate the meringue.
  • Transfer the batter into a piping bag. (You may use the ring mould.)
  • Heat up a non-stick pan.
  • Wipe some oil onto the pan using a kitchen towel.
  • Pipe the batter onto the pan in a circular manner going up vertically till 2.5 to 3 cm high. (I made about 5 pancakes in one pan.)
  • Cover the pan.
  • Let the pancake cook under very small fire.
  • Open the cover after about 3-4 minutes and flip the pancakes to the other side.
  • Once the other side is brown, remove the pancake to be cooled on a metal rack.
  • You may serve the pancakes with jam or butter if you wish.

Saturday, January 11, 2020

Pork Chop with Roasted Vegetables


Usually on normal days I will stew, braise or stir-fry lean pork for my husband and children. Once in a while I will make char siew or roasted pork for them. Sometimes I make a Western meal to give them a change by pan-frying the pork and making a sauce to pour over it. Usually, it will be accompanied by roasted vegetable, mashed potato, soup and homemade baguette. A wholesome meal I think for the family. 

Ingredients:
  • 3 pieces of lean pork about 150 - 200 g each (3 servings)
  • 3 tbsp light soy sauce
  • 3 tbsp dark soy sauce
  • 2 tbsp oyster sauce
  • 1 tbsp sesame oil
  • 1 tsp salt
  • 1 tsp pepper
  • Cooking oil
  • 6 tbsp all-purpose flour
  • 1 tsp garlic powder
  • A dollop of butter
  • 1 small head of broccoli
  • 1 small carrot
  • 1 small red capsicum
  • 1 small yellow capsicum
  • 1 large potato
  • Salt
  • Pepper
  • Olive oil

    Method:
    • Marinade the pork with light n dark soy sauce, oyster sauce, sesame oil, salt & pepper for at least 3 hrs. The pork would taste even better if it is marinated overnight in the refrigerator.
    • Take the pork out from the refrigerator 1 hour before it is to be pan-fried.
    • Heat up a pan with cooking oil.
    • Add 6 tbsp all-purpose flour into a plate. Add 1 tsp garlic powder into the plate. Mix up the flour and garlic powder.
    • Coat pork with flour mixed with garlic powder n pan fry it till cooked. Keep the marinating sauce.
    • Wash pan.
    • Heat up the pan and put a dollop of butter into pan. Pour the marinating sauce into it. Thicken the sauce with flour. Keep on stirring the sauce until there are no lumps. Pour over pan-fried pork.
    • Roasted Vegetable
      • Wash and cut up 1 head of broccoli.
      • Peel of skin of 1 carrot. Slice it into 0.5-cm slices diagonally.
      • Wash and cut up 1 small red capsicum.
      • Wash and cut up 1 small yellow capsicum.
      • Wash and slice 1 large potato into 1-cm slices.
      • Arrange the cut vegetable on a baking tray, with the hard ones (potato and carrot) in the centre.
      • Drizzle salt, pepper and olive oil on the vegetable.
      • Roast the vegetable at 180 deg Centigrade for a total of 40 minutes.
      • After 20 minutes, remove the capsicum and broccoli.
      • Remove the carrot and potato after 40 minutes.
    • Arrange the pork chop and roasted vegetable on a serving plate.
    • The Pork Chop is ready to be served.


    Thursday, January 2, 2020

    Mutton Curry


    Goat meat or mutton is considered to be the healthier option among all meats - beef, pork, lamb, turkey and chicken. This is because when it comes to fat, it is leaner than the other meats. It also has far lesser calories. According to the article,"Nutritional Facts About Goat Meat You Should Know" in Times of India, while red meats are high with saturated fat that increases cholesterol level and leads to heart disease, goat meat has very low level of saturated fat and will not harm heart health. Goat meat also has higher level of iron when compared to similar serving size of beef, pork, lamb and chicken. Iron is an important nutrient, a lack of which will lead to anaemia. Goat meat is also packed with protein, another important nutrient for our bodies. Goat meat also contains vitamin B which is known to help in burning body fats and vitamin B12 which helps in getting us healthy skin.

    Mutton has a very strong smell and one of the best ways of cooking it is in the curry. The many spices - cinnamon, star anise, cardamon, cloves used in the curry will help to ease the smell of the meat.


    Ingredients:
    • 750 g mutton (5 people)
    • Spices to saute:
      • 2 sticks cinnamon
      • 3 pcs star anise
      • 3 pcs cardamon
      • 3 pcs cloves
    • Ingredients to blend:
      • 2 inch ginger
      • 5 pcs shallot
      • 7 cloves garlic
    • 2 sprig curry leaves
    • 3 medium-size tomato, cut into wedges
    • 3 medium-size potato, cut into big pieces
    • 2 tbsp turmeric powder
    • 1 tbsp sweet cumin
    • 2 tbsp meat curry powder
    • 1 tbsp chili powder
    • Salt, to taste
    • Cooking oil
    • Water

    Method:
    • Heat wok with 5 tbsp cooking oil.
    • Saute spices till fragrant.
    • Add blended ingredients & saute.
    • Add curry leaves.
    • When fragrant add mutton and stir.
    • Add turmeric powder, sweet cumin, meat curry powder & chili powder.
    • Add enough water to cover mutton.
    • Add potato & 1/2 of the tomato.
    • Transfer all into pressure cooker to cook till mutton is soft.
    • After about 30 minutes, turn off fire & let the pressure be released.
    • Open the cover of pressure cooker & add the balance of the tomato.
    • Add salt, to taste.
    • Cook for about 5 minutes without cover.

    Monday, December 23, 2019

    Muruku


    Muruku is a popular snack among most of us at any time as they are savoury and crunchy. However, I believe that it is a must-have snack in Indian homes during Deepavali. It had been a popular snack for us during Chinese New Year for the last few years. Once we start munching them we find it difficult to stop and a few bottles would finish in no time as families gather during this festive season.

    There are a few types of muruku - ribbon muruku, omapodi (the short string/noodle ones usually sold with roasted peanuts and green peas), butter muruku, sweet cumin (jintan manis) muruku and garlic muruku. I have made a simple one by just mixing omam ajwain seeds and white sesame seeds to the muruku flour. You may add some sweet cumin to it for a more distinct taste.


    Ingredients:
    • 500 g muruku flour
    • 2 1/2 tbsp omam ajwain seeds
    • 2-3 tbsp white sesame seeds
    • 1/2 tsp salt
    • 1 tsp black pepper powder
    • 5 sprigs of curry leaves, chopped up very finely (to ensure that they can pass out through a star nozzle)
    • 30 g butter
    • 1/2 cup santan
    • 300 - 350 g / ml water 
    • Cooking oil

    Method:
    • Weigh muruku flour into a mixing bowl.
    • Add oman ajwain seeds, sesame seeds, salt, black pepper powder and curry leaves to a mixing bowl. Stir to mix them up.
    • Add butter and santan to the mixture and stir.
    • Add 300 g / ml of water to the bowl.
    • Stir the water with the ingredients to achieve a smooth batter. If the batter is dry, slowly add the remaining water (or more), spoonful by spoonful till you get a smooth and soft consistency (which will allow you to pipe it out easily through a nozzle). (Remember that different muruku flour absorb water differently.)
    • Once you have achieved the required consistency, transfer the batter to a piping bag with a star nozzle.
    • Heat up a pan with about 1 cm cooking oil. (Do not put too much oil as the batter will move when you are piping it out. You may find it difficult to pipe the batter into the required shape.)
    • Pipe out the batter in a circular manner.
    • Fry the muruku till one side is golden brown. Flip to the other side and fry it till golden side.
    • Scoop out the muruku onto a kitchen towel to absorb excess oil.
    • Keep the muruku in an air-tight container when they are completely cooled down.

    Friday, December 20, 2019

    Pandan Swiss Roll & Floral Pandan Swiss Roll


    The pandan or screwpine plant is used widely in South Asia and Southeast Asia cooking mainly as flavouring and colouring. As such, we can find lots of pandan plants being grown in many houses in the ground or in pots so that they are easily available when required.

    The leaves are bruised and added to rice which is being cooked to enhance the fragrance of the rice for nasi lemak. These bruised leaves are also added to sweet dessert soup like red beans soup, green bean soup and bubur cha cha for the sweet smell. The leaves are also blended with water for the green colour and fragrance in baking and making of cakes and traditional kuih like pandan swiss roll, pandan sponge cake, pandan layer cake, seri muka/pulut kaya, kuih koo, kuih talam, kuih kosui, ondeh-ondeh and many more. Besides these, the leaves are used as wraps for deep-frying, grilling, barbecuing or steaming chicken, meat and fish, for example, pandan chicken. Lastly, we can also use the pandan leaves to make pandan-lemongrass tea.

    I grow many pandan plants in my garden as I use them a lot in my cooking and baking. The Swiss roll is one of the cakes in which I use the pandan juice. Sometimes I just make basic plain Pandan Swiss Roll but at other times, I like to draw patterns to enhance the beauty of my Swiss rolls.


    Ingredients:

    For the Pattern:
    10 g egg white
    10 g unsalted butter
    10 g icing sugar
    5 g cake flour
    5 g dark cocoa powder

    For the Meringue:
    4 egg whites, Grade B
    1/4 tsp cream of tartar
    60 g castor sugar

    For the Batter:
    4 egg yolks, Grade B
    20 g castor sugar
    1/4 tsp salt
    45 g oil (I use corn oil)
    40 g pandan juice from 12 pandan leaves + water
    1 tsp vanilla essence
    65 g cake flour
    1 tbsp milk powder

    For the Filling:
    130 g whipping cream
    20 g powdered sugar


    Method:

    Drawing on the Swiss roll:

    • Making the batter for the pattern:
      • Add the egg white into a bowl.
      • Add the butter to the bowl.
      • Add sugar to the bowl.
      • Add flour and cocoa powder to the bowl.
      • Mix all the ingredients until there are no lumps.
      • Put the pattern batter into a piping bag.
      • Tie up the piping bag with a rubber band.
      • Set it aside.
    • Choose a pattern that you like.
      • Place the pattern on your baking tray.
      • Place a piece of parchment paper over the pattern.
      • Secure the parchment paper to the baking tray with a paper/cellophane tape.
      • Cut off the tip of the piping bag.
      • Use the tip of the piping bag to trace the pattern onto the parchment paper.
      • Once done, remove the paper/cellophane tape and the pattern below the parchment paper from the baking tray.
      • Place the parchment paper on the baking tray into the freezer.
      • Take out the baking tray with the parchment paper from the freezer when you are about to pour your Swiss roll batter into it.

    Making the Swiss Roll Batter:
    • Put a tray of hot water into the oven. Pre-heat oven to 160 degrees Centigrade. (Adjust according to your oven.)
    • Line a rectangular pan (10 inch x 14 inch) with a good quality parchment paper. (This is to ensure that the cake will not stick to the parchment paper.)
    • In a mixing bowl, whisk the egg white with a hand mixer over low speed. (Please ensure that your bowl and beaters are dry and have no traces of oil otherwise the egg white will not rise.)
    • Once large bubbles are formed, add the cream of tartar.
    • Whisk till small bubbles are formed.
    • Add sugar gradually in 3 batches.
    • Whisk the egg white till stiff peak.
    • Once stiff peak is achieved, set the meringue aside.
    • In another mixing bowl, add in the egg yolks, sugar and salt. Whisk until they are creamy.
    • Add the oil and continue to mix until they are well combined.
    • Add the pandan juice and vanilla essence. Whisk to mix them well.
    • Sieve the cake flour and milk powder into the egg yolk mixture. Mix until well combined and the batter is smooth.
    • Take 1/3 of the meringue and add to the batter. Use the whisk to mix the meringue with the batter gently, taking care not to deflate the meringue.
    • Add another third of the meringue into the batter. Gently mix it with the batter.
    • Add the remaining meringue and gently fold it into the batter using a spatula.
    • Pour the batter into the baking pan and spread it evenly with a spatula.
    • Drop the pan onto the counter-top from about 1 foot high to break out any large bubbles. Repeat this 2 to 3 times.
    • Bake in the oven at 160 deg C for 20 minutes until the cake surface is golden brown. Do not over bake or the cake will crack when you roll it later.
    • Once the cake has baked, remove the pan from the oven.
    • Drop the pan from 1 foot high onto the counter-top to prevent shrinkage of the cake.
    • Remove the cake from the pan onto a wire rack.
    • Put another sheet of parchment paper on the cake and invert it to remove the parchment paper below.
    • Let the cake cool down completely on the wire rack.
    • While waiting for the cake to cool down, whip the cream with the powdered sugar till it is stiff. (Test for sweetness. Add more sugar if the cream is not sweet enough for you.)

    Filling and Rolling Up the Swiss Roll:
    • Cut 3 shallow slits (about 1 foot apart) across the cake at the end from which you will start rolling the cake. (This is to aid in the rolling of the cake i.e. to ensure that it does not crack when you start rolling it.)
    • Spread the cream evenly on the cake.
    • Roll the cake and wrap it in the parchment paper. Put the roll into a plastic bag or cling wrap it to prevent dryness.
    • Keep the roll in the refrigerator for at least 3 hours.
    • After 3 hours, remove cake from the refrigerator.
    • Remove the plastic bag or cling wrap and parchment paper and slice the roll.
    • Serve chilled.