al-luckylady

Saturday, February 20, 2021

Yogurt


My husband has been making yogurt (also spelled yoghurt, yogourt or yoghourt) for many years. It was only recently that I asked him to teach me how to do it. Actually it is a very simple process. Making it yourself will save you a lot of money. Also, you need not run out of it or inconvenience yourself to go to the store when you run out of it. Furthermore, you can choose the type of milk that you want to use. My husband usually eats it on its own or with honey although at times, he will eat it with cut fruits like apples, honey dew, watermelon and so on or with whole fruits like strawberries, grapes and blueberries.

Yogurt is a food produced by bacterial fermentation of milk. The bacteria used to make yogurt are known as yogurt cultures. Wikipedia. According to Healthline there are 7 impressive health benefits of eating yogurt:

  • It is rich in important nutrients like, for example, calcium which is needed for our bones and teeth.
  • It's high in protein.
  • Some varieties may benefit digestive health. Yogurt contains live bacteria, or probiotics which have been shown to lessen the uncomfortable symptoms of irritable bowel syndrome. Those who have eaten yogurt have shown improvements in bloating and stool frequency
  • It may strengthen your immune system and reduce the likelihood of you contracting some illnesses.
  • It may protect against osteoporosis.
  • It may benefit heart health especially those fat-free and low-fat yogurt. 
  • It may promote weight management.
However, take note that yogurt may not be for you if you are lactose intolerant and is allergic to milk.


Ingredients:

  • 80 g  milk powder (You may add slightly more if you want a thicker yogurt.)
  • 600 g warm water, about 100 deg F or 38 deg C
  • 2 tbsp commercial yogurt (It becomes your starter only for the first time)

Utensils: (Remember: they must be very clean)
  • A glass or plastic bottle with a cover (Rinse with hot water just before using it.)
  • A plastic spoon

Method:
  • Stir milk powder and water till milk powder is dissolved.
  • Add commercial yogurt to the milk and stir vigorously.
  • Pour the mixture into the bottle.
  • Cover the bottle.
  • Wrap the bottle with a towel.
  • Place it in the cabinet and let the mixture incubate for 12 hours. (Some people only let the mixture incubate for about 7-9 hours. The longer the incubation the more sour would be the yogurt.)
  • Remove the bottle from the cabinet and place it in a fridge.
  • The yogurt is ready for consumption once it is cold.

Sunday, February 14, 2021

Fried Udon with Minced Meat


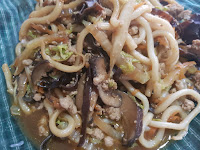
I fell in love with the Udon as they are smooth and chewy. While I fried it with prawns and fish balls the last round, this round I fried it with minced meat and added long cabbage, carrot, Shiitake mushrooms and woodear. And, I also fried a bigger portion so that everyone could eat to their hearts' delight. It is good for breakfast, lunch or dinner.


Ingredients (4 servings):

  • 400 g udon
  • 4 long cabbage leaves
  • 1 small carrot
  • 2 pieces Shiitake mushroom
  • 150 g minced meat
  • 4 pieces of woodear
  • 4 cloves garlic, chopped
  • 2 tbsp sesame oil
  • 2 tbsp cooking oil
  • 3 tbsp light soy sauce
  • 1 tbsp dark soy sauce
  • 1 tsp salt
  • 1/2 tsp pepper powder
  • 1 cup water

Method:
  • Wash and cut long cabbage leaves into thin strips, width-wise.
  • Grate the carrot into long strips
  • Soak Shiitake mushroom till soft. Then, slice them up.
  • Soak the woodear and cut them up into long strips.
  • Heat up sesame and cooking oil in a kuali.
    • Add Shiitake mushroom slices to the kuali. Fry them till they are fragrant.
    • Add chopped garlic and fry them till they are fragrant.
    • Add minced meat and fry till it is half-cooked.
    • Add long cabbage, carrot and the wood ear to the kuali.
    • Fry till the long cabbage and carrot are soft. (Minced meat should be cooked by now.)
    • Add water to the kuali.
    • Season with light and dark soy sauces, salt and pepper..
    • Let the sauce simmer for about 5-7 minutes.
  • At the same time boil a pot of water using the other burner.
    • When the water is boiling, add udon to the pot.
    • Gently use a fork to loosen the udon.
    • Once they have loosened, pour them immediately into a colander to drain off the water.
  •  Add udon to the kuali and fry it for a short while.
  • Ladle the udon onto a plate and serve hot.
  • You can serve it with a topping of chili padi, fried shallots, fried onions or scallions.

Saturday, February 6, 2021

Egg Tofu with Mixed Vegetables


I always have egg tofu and mixed vegetables in my fridge, the egg tofu is usually for steaming with pork or braising with fish and the mixed vegetables for frying rice. Having these ingredients ready, it was easy to dish up Egg Tofu with Mixed Vegetable, a delicious dish for either lunch or dinner. 


Ingredient:
  • 2 tubes of egg tofu
  • 150 g mixed vegetables
  • 6-8 pcs of prawns, shelled and de-veined
  • 1 egg
  • 2 cloves garlic, chopped
  • 3 tbsp corn flour / tapioca flour / potato flour
  • 1/2 cup water
  • 2 tbsp light soy sauce
  • 1/2 tsp salt
  • 1/2 tsp white pepper powder
  • Cooking oil


Method:
  • Heat wok with cooking oil.
  • Cut egg tofu into 1-cm height.
  • Coat with flour and gently put them into wok.
  • Fry them till both sides are golden brown. Ladle up and set aside.
  • Remove oil from the wok leaving about 2 tablespoons.
  • Add garlic to the wok and fry them till they are fragrant.
  • Add prawns and mixed vegetables to the wok and fry them till the prawns are cooked and the mixed vegetables are softer.
  • Add water to the wok and let it boil.
  • Beat the egg and drop it into the wok stirring the water in a circular movement.
  • Add fried egg tofu to the wok.
  • Add light soy sauce, salt and pepper to the wok.
  • Let the sauce simmer for about 10 minutes.
  • If the sauce is too watery, add some water to the remainder of the flour which was used for coating the egg tofu earlier, stir it and pour it into the wok, gently stirring the ingredients.
  • Dish up and serve.

Tuesday, February 2, 2021

Chicken Floss


Chicken Floss (or Kei Bak Hu in Hokkien) is a good accompaniment for white porridge and even rice. It can also be eaten on its own or spread on bread for breakfast or tea time. It is very expensive if we were to buy from those shops selling bak kwa and meat floss. As it is so easy to make, why not make it ourselves. 

Ingredients:

  • 400 g chicken breast (without skin and bones)
  • 4 slices of ginger
  • 3 cloves of garlic (whole)
  • 1/2 tsp salt
  • 3 tbsp brown sugar
  • 1 tbsp light soy sauce
  • 1 tbsp cooking oil
  • Water, enough to cover the chicken breast

Method:
  • Boil the chicken breast in a pan with enough water to cover it.
  • Add ginger slices, garlic cloves and salt to the pan.
  • Cover the pan and boil till the chicken meat is soft. (If you prefer long strands of chicken floss then do not over boil the meat.)
  • Remove and discard the ginger and garlic.
  • Remove excess chicken broth. (Do not discard. You may use the broth to cook porridge.)
  • Add sugar and light soy sauce to the chicken.
  • Stir the chicken over very low fire. As you stir break down the chicken into strands by pressing the chicken against the base of the pan.
  • Stir until dry.
  • Heat up kuali with 1 tbsp cooking oil.
  • Transfer chicken to kuali and keep on stirring the floss under very low heat (to prevent burning) till it is very dry and golden brown. Fry longer if you want it to be more crunchy.
  • Once done, spread it out on a metal plate to cool down.
  • Transfer it to a glass bottle for keeping.